

Custom Anodizing Equipment: How to Choose the Right Setup for Your Finishing Needs
2026-11-02
Choosing anodizing equipment isn’t just about matching specs—it’s about anticipating the quirks of your parts, your line speed, and the finishes your customers actually demand. Whether you’re upgrading a single tank or building a complete custom line, the wrong setup quietly drains time and money. At Junda, we’ve seen too many shops settle for off-the-shelf systems that fight their process instead of supporting it. This guide cuts through the noise to help you pinpoint what really matters before you invest.
Nail Down Your Anodizing Type Before Buying Anything
Jumping into anodizing without deciding on the exact finish you need is a fast track to wasted money and mismatched parts. Type II sulfuric anodizing gives you a solid, everyday protective layer with decent color options, while Type III hardcoat delivers serious wear resistance but changes dimensions and limits bright dyes. If you need a thin, non-conductive base for paint or glue, chromic acid anodizing might be the ticket, but it brings its own handling rules. Match the type to the actual job—don't just grab the most common spec and hope it works.
Your setup costs shift dramatically depending on the process you pick. A basic Type II line can run off a benchtop rectifier and a few plastic tanks, but Type III typically demands chillers, stronger agitation, and tighter temperature control just to keep the bath from eating your parts. Chromic acid adds ventilation and waste treatment headaches that a home shop rarely wants to touch. Buying tanks, chemicals, and power supplies before locking down the anodize type means you'll either overbuild for a simple job or underbuild for a tough one.
Think about the final part geometry and alloy as part of the decision. High-copper alloys anodize poorly in sulfuric baths and may need different parameters or a different electrolyte altogether. Castings, welds, and tight threads all behave differently under each anodize type. Lay out your worst-case part first, then pick the process that handles it cleanly. Otherwise you end up with a pile of equipment tuned for a finish you can't actually use on the parts that matter.
Tank Size Is About Workflow, Not Just Part Dimensions
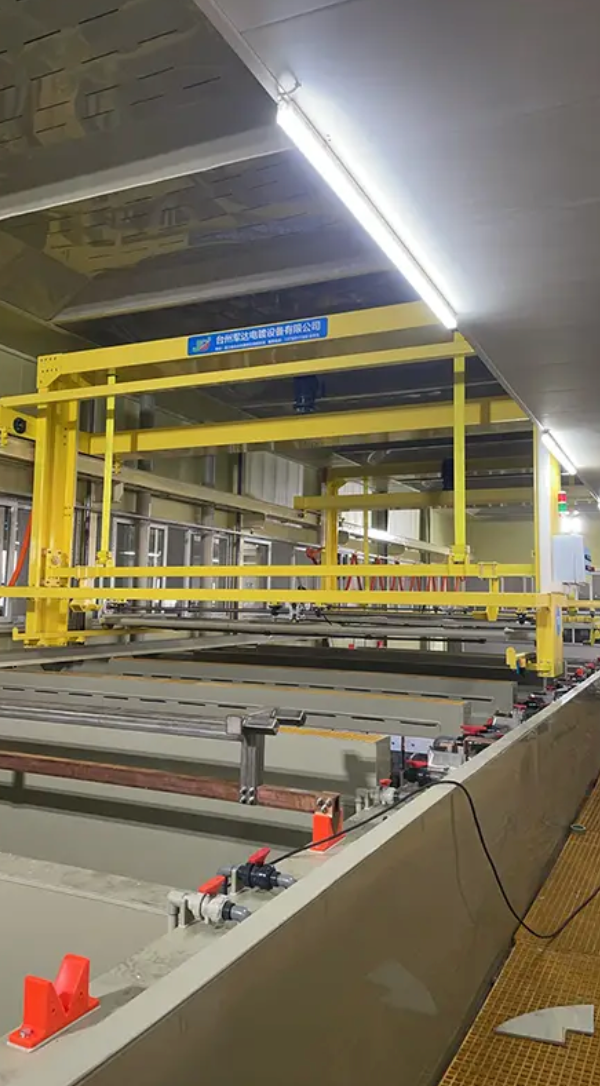
When selecting a tank, people often fixate on the largest part they need to clean, assuming that if the part fits, the tank is right. But real productivity depends on how the tank supports your daily workflow, not merely on part dimensions. A tank that matches your part size but forces awkward loading, slow drainage, or frequent refills can cripple throughput. Think about how parts move in and out, how many cycles you run per shift, and whether the tank allows you to stage, soak, and unload without wasted motion.
A well-chosen tank size accommodates not just the part, but the entire process around it. For example, extra depth may let you stack smaller baskets or run multiple parts per cycle, cutting labor time. Extra width might allow a second operator to work from the opposite side, reducing bottlenecks. Conversely, an oversized tank wastes energy, chemicals, and floor space, while making routine maintenance more cumbersome. The goal is to match tank volume to realistic batch sizes and operator ergonomics, not just to the biggest single piece you occasionally handle.
Ultimately, tank dimensions should be derived from a time-and-motion study of your actual workflow: how parts arrive, how long they soak, how they are agitated or heated, and how they are removed. A tank that is slightly larger in one dimension can enable a rack that holds 20% more parts, turning a three-hour job into a two-hour job. Measure your workflow first, then choose a tank that disappears into that flow rather than forcing you to adapt to its constraints.
Power Supply Specs Often Get Overlooked—Until They Fail
Most builders obsess over GPU benchmarks and CPU core counts while the power supply gets tossed into the cart as an afterthought. It's the one component that runs silently in the corner, and as long as the system boots, nobody reads the fine print on the label. Then a random shutdown during a gaming session, or a drive that keeps dropping offline, forces you to actually check the specs—only to discover the 12V rail was never designed to handle your overclocked load, or the "650W" rating only applies at 25°C, not inside a warm case.
The confusion between peak and continuous wattage causes a lot of grief. A cheap unit might advertise 700W but only sustain 500W before the protection kicks in, while a quality 550W unit would have handled the same rig without breaking a sweat. People rarely look at hold-up time, ripple suppression, or input voltage range until the air conditioner cycles on and the PC reboots because the power supply was built for 230V only.
Upgrades expose the hidden limitations, too. Adding a second GPU or a stack of hard drives often reveals there aren't enough PCIe or SATA connectors, or the non-modular cable spaghetti blocks the front intake. By then the power supply has already cost you hours of troubleshooting, maybe a corrupted filesystem, and the realization that saving $40 upfront wasn't worth it.
Cooling and Ventilation Are Not Afterthoughts
It is easy to treat cooling as a final checkbox once the main layout is locked in. By then, heat sinks, fans, and vent paths get squeezed into leftover space, forcing air through awkward turns and raising internal temperatures more than necessary.
Planning airflow early shifts the outcome. Intakes placed low, exhausts placed high, and a clear route away from heat-producing parts can reduce the need for extra fans or high RPMs. That means less noise, less dust buildup, and components that are not constantly fighting their environment.
Small details matter too: accessible filters, balanced pressure, and grille shapes that do not choke the stream. When these choices are made alongside the main structure, cooling becomes part of the design rather than a corrective measure added at the end.
Choose the Right Automation Level for Your Shop Floor
Finding the sweet spot between full manual labor and lights-out manufacturing rarely comes from a one-size-fits-all checklist. A small batch job shop often benefits more from flexible cobots that can be wheeled between workstations than from a fixed robotic cell built for a single part number. On the other hand, a high-mix production line might only need sensor-driven part feeders to reduce the dullest repetitive motions, leaving skilled operators in charge of quality calls and changeovers. The first step is to map where time actually disappears—setup, loading, inspection, or material handling—before deciding which of those bottlenecks deserves a machine’s help.
It also pays to think in terms of stages rather than a one-time leap. Starting with pallet changers or automatic door openers on a CNC mill can free up several hours a week without forcing a full process overhaul. Once operators trust the equipment and suggestions for improvement surface, adding bar feeders, chip conveyors, or simple vision checks becomes a natural next move. This gradual path keeps risk low and lets the team learn which tasks genuinely belong in a robot’s hands versus which still rely on human judgment.
Last, resist the urge to automate a messy process before stabilizing it. If tolerances drift or raw material arrives inconsistently, bolting on automation only produces scrap faster. The right automation level is the one that handles volume, variety, and the current skill mix without demanding a hero effort to keep running. Sometimes that means a semi-automatic fixture; other times it means a fully integrated cell—but only after the surrounding process is predictable enough to support it.
Build In Room to Grow Without Paying for It Twice
Adding a room now doesn’t have to mean ripping it apart later. Start by mapping out where the next phase of your home might go, then pour footings or run conduit to that spot while the ground is already open. The extra hundred dollars in materials can save thousands in demolition and rework down the line.
Think about rooflines and window placement as if the future addition already exists. A slightly steeper pitch or a header sized for a wider opening costs little today but keeps you from rebuilding walls when the time comes. That’s the real trick: make today’s layout support tomorrow’s square footage without doubling your spend.
FAQ
Start with the parts you finish most often. Their size, alloy, and quantity per rack will drive nearly every other decision — from tank dimensions to rectifier capacity. If you skip this step, you end up with a line that fits a hypothetical workload instead of your real production mix.
Leave headroom in the rectifier and tank spacing, not in the number of stations. A 20% increase in amperage costs far less than re-plumbing an entire line later. Also choose modular frames that let you add tanks or swap agitation systems without cutting and welding the main structure.
Look beyond just voltage and amperage. Ripple percentage, ramp-up control, and pulse capability matter more than peak output for many alloys. A rectifier with tight ripple — under 5% — and programmable ramp profiles gives you repeatable results on 6000-series aluminum, while a basic constant-voltage unit may cause burning on thin sections.
You need fume extraction that pulls acid mist away from the operator's breathing zone and a scrubber sized for your total tank surface area, not just the anodizing tank. Include emergency eyewash stations, acid-resistant flooring with containment, and temperature interlocks that shut down heating elements if a tank runs low.
Yes, because the liner protects the tank from acid, but the tank material protects the liner from punctures and heat distortion. Polypropylene tanks with welded seams handle anodizing temperatures well, but you need a rigid outer support frame. Steel with a bonded liner works if you never exceed 32°C and inspect for condensation regularly.
Count how many times per shift an operator has to adjust current, time, or agitation. If you do fewer than three rack loads per hour, manual controls with clear metering are usually enough. Above that, or when you run mixed alloys with different ramp profiles, a semi-automated PLC with recipe storage prevents costly human errors.
Rack building materials, chiller capacity, and wastewater treatment often cost more than the tanks themselves. Also factor in the power distribution upgrade — a 10,000-amp rectifier needs a dedicated transformer and busbar run. Ask vendors to quote the total installed cost, including rigging and electrical tie-in, not just the equipment skid.
Sometimes, if the frame is in good condition and you only need to change the rectifier, cooling, or agitation. But if your tank spacing is too tight for proper cathode placement, or the ventilation is undersized, retrofitting becomes more expensive than a purpose-built line. Get a thermal and airflow assessment before committing.
Conclusion
Buying custom anodizing equipment starts long before you compare tank dimensions or rectifier outputs. The first decision is the anodizing type itself—Type II, Type III, or a specialty process like phosphoric or boric-sulfuric—because every downstream choice, from tank materials to voltage needs, hinges on that chemistry. Tank size, for example, isn't just about the largest part you plan to run. It reflects your actual workflow: how many racks go in per shift, what kind of spacing prevents burning, and whether you can load and unload without turning the line into a bottleneck. Power supply specs get even less attention until something trips mid-cycle. A rectifier that can't hold current density under load will ruin a batch faster than a scratched part, and oversizing without adjusting ripple or ramp control just wastes money and energy.
Cooling and ventilation deserve the same weight as the anodizing tank itself. Hardcoat processes generate serious heat, and without enough chiller capacity or air movement, you'll fight inconsistent coating thickness and acid mist on every run. Automation should match how your shop actually works—hand lines still make sense for low-volume or odd-shaped work, while hoists and programmable controls earn their keep when repeatability and throughput matter. Finally, leave room for growth without paying for it twice. That might mean buying a slightly longer tank, leaving space in the power supply cabinet, or adding plumbing now instead of tearing out walls later. The right custom setup isn't the one with the most features; it's the one that fits your finishing needs today and won't become a constraint a year from now.
Contact Us
Contact Person: hayyr
Email: [email protected]
Tel/WhatsApp: 8613082110525
Website: https://www.jundaelectroplating.com